Garden & Outdoors

Why Tomato Plants Turn Yellow — And What's Usually Behind It

Why Tomato Plants Turn Yellow — And What's Usually Behind It

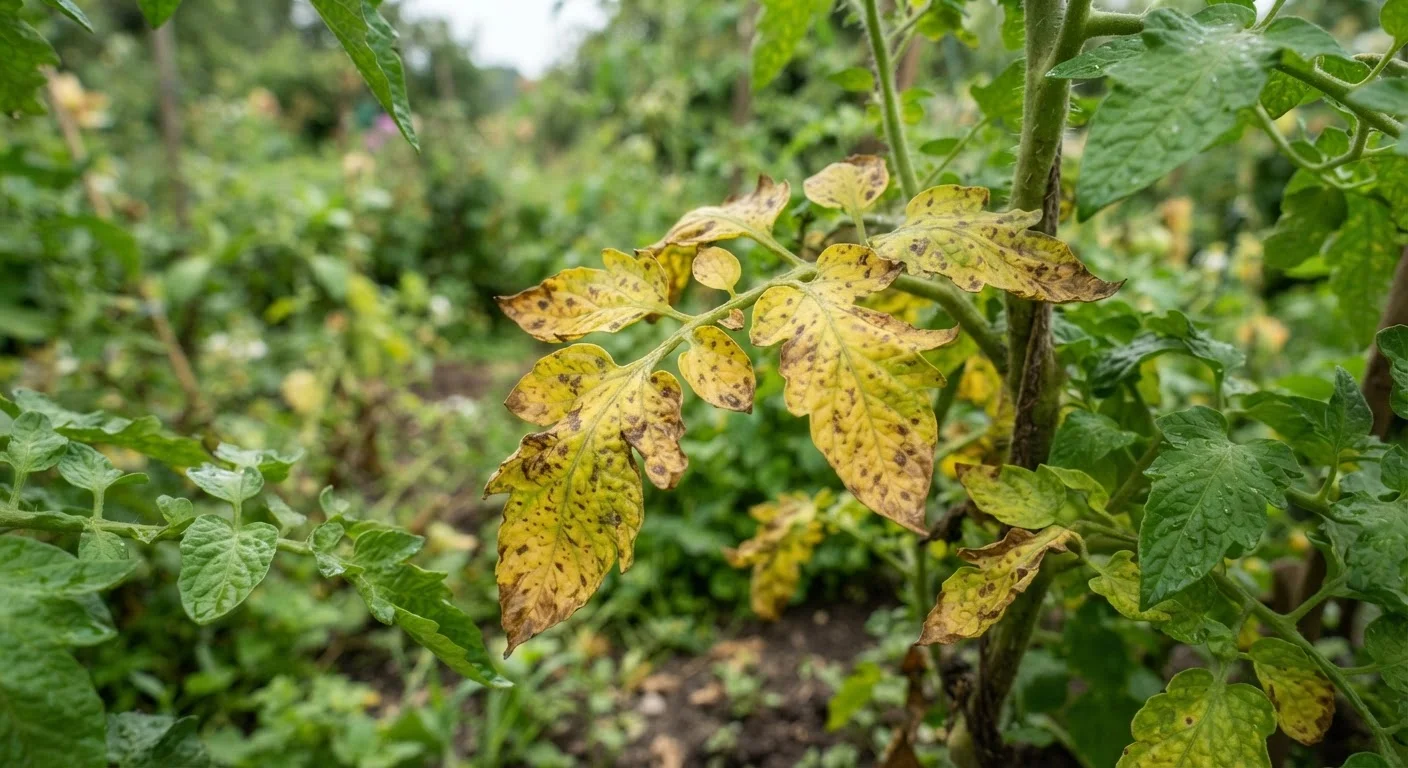
Photo: AdvisorBooth.net editorial

Yellowing tomato leaves can signal a dozen different problems. This guide breaks down the most common culprits and how to tell them apart.

Key Takeaways

  • Yellowing tomato leaves have multiple possible causes, so accurate diagnosis is essential before acting.
  • Overwatering is one of the most frequent and easily corrected causes of yellow tomato foliage.
  • Nutrient deficiencies — especially nitrogen and magnesium — produce distinct yellowing patterns that help with identification.
  • Fungal diseases like early blight and Fusarium wilt require prompt action to prevent spread.
  • Bottom leaves yellowing first is often normal, but yellowing that moves upward signals a real problem.

Reading Your Plant: Why Yellow Leaves Aren't All the Same

Tomato plants communicate stress through their leaves, and yellowing — called chlorosis — is one of their loudest signals. The tricky part is that a dozen different problems can produce the same visual symptom. Treat the wrong cause and you may make things worse while the real issue progresses.

Before reaching for a fertilizer or fungicide, slow down and observe. Ask yourself: Which leaves are yellowing? Start at the bottom and work upward. What pattern does the yellowing follow? Is it between the veins, at the edges, or covering the whole leaf? Are there spots, lesions, or a powdery coating? These details are your diagnostic clues.

The sections below walk through the most common mistakes gardeners make when yellowing appears — and how to read the signs correctly so you can respond with confidence.

1

Overwatering and letting roots sit in soggy soil.

Why it happens: Gardeners often equate more water with more care, especially during hot stretches when they worry the soil is drying out too fast.
How to avoid: Water deeply but infrequently — let the top inch or two of soil dry out between waterings. Stick your finger into the soil before reaching for the hose. Ensure containers and raised beds have adequate drainage holes.
2

Misidentifying a nitrogen deficiency and over-fertilizing in response.

Why it happens: Nitrogen deficiency causes older leaves to turn a uniform pale yellow, which looks alarming and prompts many gardeners to dump fertilizer on the plant immediately.
How to avoid: Confirm the deficiency by checking yellowing patterns — nitrogen moves from old to new leaves. Then apply a balanced fertilizer according to package directions. Over-fertilizing causes its own damage, including burned roots and blossom drop.
3

Overlooking magnesium deficiency, which mimics other problems.

Why it happens: Magnesium deficiency produces interveinal chlorosis — the leaf tissue between the veins turns yellow while the veins stay green — which is often confused with iron deficiency or disease.
How to avoid: If you see interveinal yellowing on older leaves specifically, a diluted Epsom salt solution (magnesium sulfate) applied as a foliar spray is a traditional remedy many gardeners use, though confirming soil pH and nutrient levels with a soil test is the most reliable approach.
4

Ignoring early signs of fungal disease, especially early blight.

Why it happens: Early blight (caused by the fungus Alternaria solani) starts with small dark spots surrounded by yellow halos on lower leaves, which many gardeners dismiss as normal aging.
How to avoid: Remove and bag affected leaves immediately — never add diseased material to compost. Avoid overhead watering, maintain good spacing between plants for airflow, and mulch around the base to reduce soil splash. Rotate tomato crops to different beds each season.
5

Planting in compacted or poorly draining soil without amending it first.

Why it happens: Gardeners often plant into native soil without testing or amending it, assuming it will support a productive tomato crop.
How to avoid: Before planting, work compost into the bed to improve drainage and soil structure. A basic soil test — available inexpensively through cooperative extension programs — reveals pH and nutrient levels that directly affect how well your plants absorb what they need.
6

Failing to recognize Fusarium or Verticillium wilt until significant damage is done.

Why it happens: These soilborne fungal diseases start with subtle lower-leaf yellowing and wilting that's easy to chalk up to heat or underwatering.
How to avoid: Cut a stem near the base — brown or orange discoloration inside the stem tissue is a telltale sign of wilt disease rather than a watering problem. Once confirmed, affected plants should be removed. Choose disease-resistant varieties (look for the letters F and V on seed packets) when planting next season.

When to Act and When to Wait

Not every yellow leaf demands intervention. Older, lower leaves naturally yellow and drop as the plant matures and redirects energy upward — this is a normal part of tomato growth, not a crisis. Pruning these leaves away keeps airflow moving through the plant and reduces the risk of soil-borne disease splashing up onto foliage.

~75%

Tomato problems traced to soil or water issues

Horticultural extension educators commonly note that the majority of tomato plant complaints stem from watering inconsistency or soil nutrient imbalances rather than pests or disease.

3–4 years

Recommended crop rotation interval for tomatoes

Many extension programs recommend waiting at least three to four years before replanting tomatoes in the same bed to reduce soilborne disease pressure.

Where you do need to act quickly is when yellowing climbs the plant, affects new growth, or comes paired with wilting, spots, or stunted fruit. Fungal and bacterial diseases spread fast in warm, humid conditions, so early removal of affected leaves — bagged, not composted — can prevent a manageable problem from becoming a full crop loss.

Don't Compost Diseased Tomato Leaves

If your yellowing is accompanied by spots, lesions, or signs of blight, resist the urge to add those leaves to your compost pile. Most home compost systems don't reach temperatures high enough to kill fungal spores, and you risk spreading the disease to next year's garden. Bag diseased material and dispose of it in the trash instead.

When in doubt, take a sample to your local cooperative extension office or Master Gardener program. Many offer free plant diagnostics and can identify soil nutrient problems, diseases, and pests accurately — saving you time and wasted treatments.

Home & Garden Editorial Team

AdvisorBooth.net

Home & Garden Editorial Team is the collective byline for our editorial team and contributor network. Articles published under this byline or an editorial pen name are researched, written, and reviewed according to our editorial standards for clarity, consistency, and independence before publication.

Home ImprovementGarden & OutdoorsHome Organization
View author profile

The content on this site is for informational purposes only and is not a substitute for professional advice. Always consult a qualified professional for guidance specific to your situation.